| ||
| HOME DOWNLOAD BUY HELP ABOUT CONTACT | ||
| Help with O2M
Using O2M The instructions below describe how to use O2M to export your Outlook email, contacts, and calendar items into files that you can then import into your OS X programs. 1. Start O2M
If you haven't already, download and install O2M from the Little Machines website.
Next, start up Outlook. (Outlook doesn't have to be running when you're using O2M, but we recommend it; performance tends to be quicker if Outlook is running. Note that when Outlook is running, you shouldn't use it actively while O2M is working; wait until O2M is finished before sending emails with Outlook).
Next, start up O2M by clicking or double-clicking on its icon. If you don't see its icon on the desktop,
try looking under When O2M starts, you'll see the word Ready in the window and a Next button.
Click the Next button to proceed to the next menu. 2. Choose a Save Folder
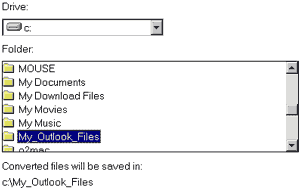
Choose a folder where you would like O2M to save your Outlook data files.
By default, O2M will save your files in the folder called c:\My_Outlook_Files. If you want
to choose another folder instead, navigate to it by clicking on the desired drive, folders, and subfolders until you reach the folder
you want.
3. Pick Outlook Email Folders to Export
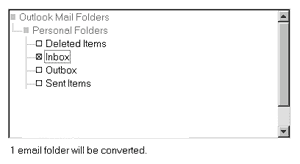
Choose the email folders in Outlook that you want O2M to export.
Click on the box next to each folder that you want to export so that an X appears. To deselect a folder, just click on it again so the X disappears.
If you didn't choose any email folders to export, skip to #7 below. 4. Filter Outlook Emails by Date
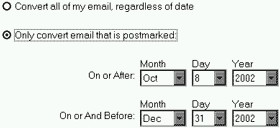
Not available in Test-Drive modeYou can choose to export all of your email, or filter email by a desired date range. To export all email in the folders you picked, select Convert all of my email.
To choose email within a desired date range, choose Only convert email that is postmarked and the date range you want.
5. Filter Attachments by Size
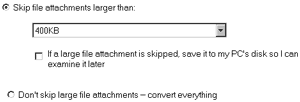
Since email attachments can eat up disk space quickly, you may choose to omit attachments when exporting your emails,
or selectively filter out attachments by size or file type.
Pick whether to skip attachments that exceed a chosen size, or you can choose not to skip file attachments at all. If you don't want to skip attachments at all, and wish all attachments to be exported, choose Don't skip. When you're finished, click Next. 6. Skip Attachments by File Type
You may want to skip attachments that aren't compatible with OS X. EXE, WSH, BAT, and similar
files won't run on a Mac without special software, so you may want to skip them.
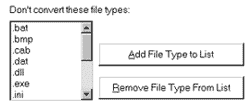 O2M lists the most common types of non-OS X file types that you might want to strip out of your exported emails. To add an additional type, click on the Add File Type to List button. To remvoe a file type from the list, click on the file's type in the box, then click the Remove File Type button.
When you're finished, click Next. 7. Choose Contact Lists to Export
O2M shows you the lists of Contacts it found in Outlook. Put an X next to each
contact list that you want exported. To deselect a list, click on it to remove the X.
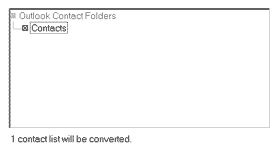 When you're finished, click Next.
If you didn't choose any contact lists to export, skip to #10 below. 8. Pick Output Format for Contacts
Some OS X programs prefer that contacts be stored in a single vCard (.vcf) file, while older programs
prefer that each contact be stored in its own vCard file. Choose the format you prefer.
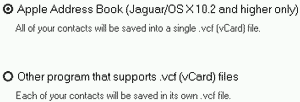 When you're finished, click Next. 9. Choose Default Home or Work Email Category
When you import your contacts into your Mac, they will be categorized as Work contacts by default.
If you'd prefer that they be categorized by default as home or personal contacts, choose Home.
(You can always change the categories for your contacts in OS X after you import them).
10. Export or Skip Outlook Calendar
To export your Outlook calendar events, choose Yes. To skip it, choose No.When you're finished, click Next.
If you aren't exporting any calendar events, skip to #14 below. 11. Pick Output Style for Calendar Items
Some OS X programs prefer that calendar events be stored in a single iCalendar (.ics) file, while older programs
prefer that each event be stored in its own iCal file. Choose the format you prefer.
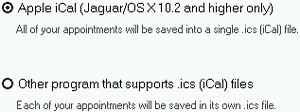 When you're finished, click Next. 12. Filter Calendar Events by Date
Not available in Test-Drive modeTo save time, you can choose to export all of your calendar events, or only events that fall within a specific date range. Choose the option you prefer. 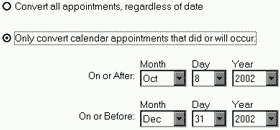 When you're finished, click Next. 13. Choose to Confirm Email Addresses
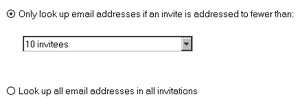
If your office uses a Microsoft Exchange Server, you can tell
O2M to convert Microsoft Office email recipients' names
into Internet addresses, which is useful if you ever need to
reply to an old office email via the Internet instead of via Exchange
Server. Looking up the Internet address for every single email recipient can be time-consuming, however, so you may want to limit lookups to cases where an email wasn't sent to tens or hundreds of recipients, since those "email blasts" can sometimes tend to be junk mail.
To look up all recipients, choose the Look up all email addresses option.
When you're finished, click Next. 14. Begin Exporting
Test-Drive mode will export only 5 emails, contacts, and calendar items. Once you buy a license,
you'll be able to export without restrictions.
O2M should be ready to start. To begin, click Next. 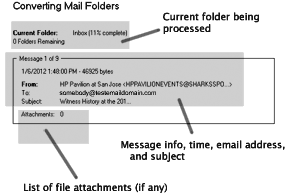 While running, O2M displays information about each email, calendar event, or contact that it is processing so you can follow its progress. To stop O2M at any time, click Stop and wait for it to stop.
15. Export Complete
When O2M is finished, it will display a summary of what was exported, and the location
of the save folder.
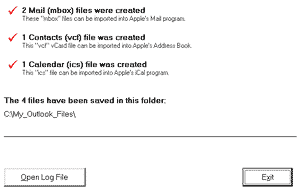 If you'd like to see a more detailed summary of what O2M did, click the Open Log File button for full details. Click the Exit button when you're done with O2M. Proceed with copying your exported files to your Mac, where you can import them into Apple Mail, Address Book, iCalendar, Entourage, and other programs. | ||
|
© 2002-2023 Little Machines, All Rights Reserved. Privacy Policy and Terms & Conditions |